When contemplating a way to make your driveway look attractive, choosing the correct material is the least of your worries. Gravel is a cost-effective, common and attractive material to use with low flooding risk. But how do you lay it on your driveways?
This blog post will outline the simple step-by-step process of laying a gravel driveway by yourself.
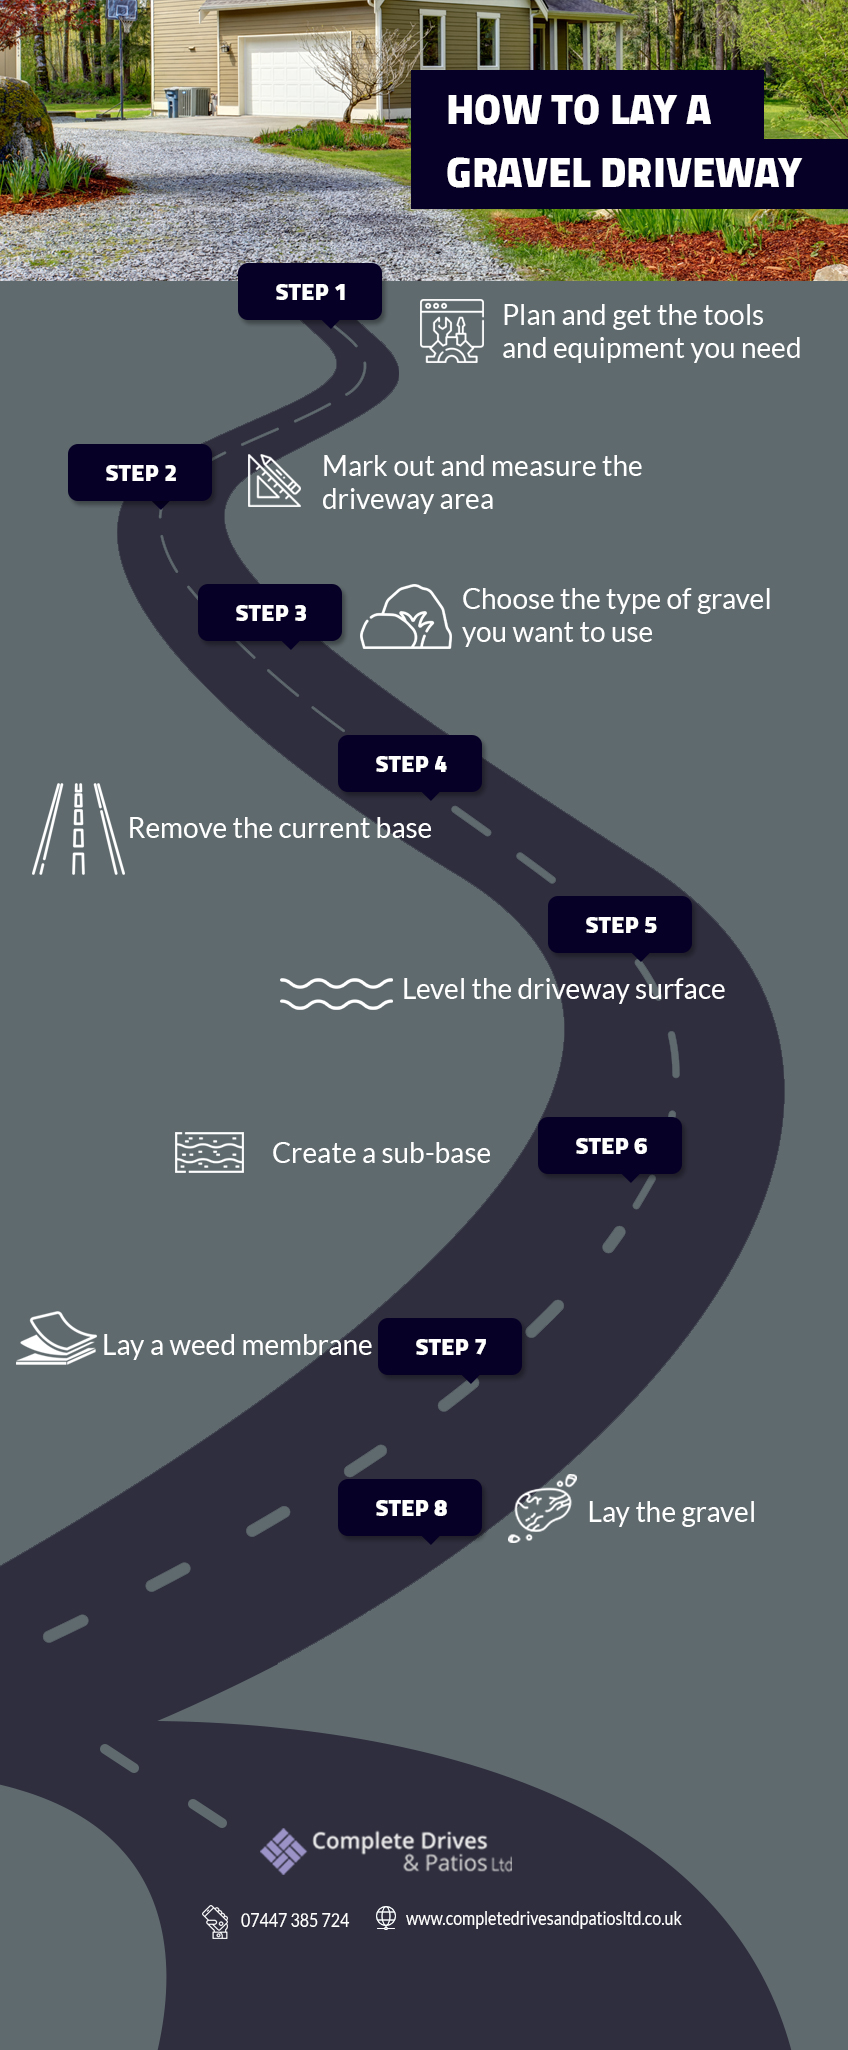
Step 1 – Plan and get the tools and equipment you need
The first step is to determine where you want your gravel driveway to be. Also, figure out the specific design you prefer. Parking area driveways are popular, but circular ones are the new trend. Remember that you will spend more money on a larger driveway than a smaller one.
In laying a gravel driveway, you will need a lot of hand-held tools like a metal rake, gardening gloves, a shovel, a wheelbarrow, measuring tapes and string lines. If the driveway is spacious, then you will also need a mechanical compactor.
Step 2 – Mark out and measure the driveway area
Like in any other construction work, the area you want to lay with gravel should be marked out before you start the project. Use sticks or stakes to demarcate the length and breadth of the driveway and string lines to enclose the area.
Since you need to know how much gravel to get for the project, calculate the area of the driveway. If the space you are dealing with is circular, you can measure it in sections before adding it together.
Step 3 – Choose the type of gravel you want to use
The next step is to pick among the various types of gravel to use on your driveway. The four top types of gravel are;
1. Golden gravel: The look of this type of gravel stems from its name. Its colour is a combination of gold, yellow and cream. Golden gravel gives driveways a stunning and stylish look.
2. Moonstone gravel: Moonstone gravel is a hardwearing gravel type that is ideal for driveways. It helps to brighten the area with its mix of colours.
3. Cotswold Chippings: This gravel type is the most popular due to its shape and colour that blends perfectly with that of any home.
4. Flamingo Gravel: As the name implies, flamingo gravel has pink, grey and white as its mixture of colours. It adds a welcoming atmosphere to your home.
Step 4 – Remove the current base
This step is perhaps the most challenging of the entire process because it requires a lot of digging. The existing base needs to be removed, so that firm ground is exposed for the gravel to be laid on. Be careful so you do not damage any service wire and pipe you may have in the area.
Step 5 – Level the driveway surface
Since most of your driveway will be covered with gravel, its surface must not be perfectly level. However, areas that are deeper than others can result in water pooling and mud puddles. Such areas will eventually need to be filled up with more gravel later, so save yourself the stress and do it now.
Step 6 – Create a sub-base
Heavy loads on a driveway are supported by the sub-base. Therefore, you should take your time to lay it correctly. The sub-base should be laid to a depth of about 50 mm and one bag of the MOT Type 1 sub-base should cover approximately 10 square metres of drive area.
Step 7 – Lay a weed membrane
A weed membrane prevents the growth of weeds on your gravel driveway. This membrane should be put above the sub-base and under the gravel. It should cover the soil thoroughly. You can use bricks to edge the membrane, but this is not necessary. The gravel will weigh the weed control membrane down. One of the best types of weed membrane is the woven geotextile fabric.
Step 8 – Lay the gravel
The last step is to lay the gravel on your driveway. If the area is slopy, then you need to reduce the gravel movement with a gravel grid. Tipping the chippings to the base layer and raking everything into place is an alternative to using gravel grids.
In conclusion
Gravel driveways last long and are environmental-friendly. They readily absorb snow and rain and are the perfect place to park your car, rather than on the mud. Laying a gravel driveway is not a daunting task. If you follow the steps we have listed above, then you should have no trouble doing it yourself.